Mitre Peak
This post includes all key info — route details, decisions and a full gear list to help you do it safely. Some peaks are iconic to look at, but unforgettable to stand on — Mitre Peak was one of those missions that weighted on the mind until it finally happened.
Read:
6 mins
Location:
Milford Sound, NZ
Date:


Our Journey
Climbing Mitre Peak has always been one of those missions that sits in the back of your mind. Most people admire it from the foreshore of Milford Sound, but very few get to stand on it. This trip was with my 17 year old son Tarn and our mate Takesh Mizoguchi Thorne. Takesh is a former professional surfer and body-flow specialist and this was his first ever overnight hike. We left Wanaka around ten in the morning and drove the four hours toward Milford. Every time I head through the Homer Tunnel the cliffs feel bigger and the valley smaller. When we arrived we launched an IRB and crossed the Sound. People can also do this mission by kayak or packraft and there are plenty of sheltered landings if you pick your line. We pulled up near the mouth of Sinbad Gully and looked up at the ridge we planned to follow. From the very first steps the terrain climbs aggressively through thick bush. There is no formed track but there is a clear line when you stay on the crest. Most of the time you are grabbing roots, shifting weight from hands to feet, and always gaining altitude. Eventually we popped out onto a small plateau. From here the terrain undulates gently before dropping down to around 700 metres where we camped for the night. In hindsight we should have pushed higher to the 900 to 1000 metre bivvy zone just beneath the steeper ridgelines, which is flatter, gives better views and sets you up well for day two. But we learned this the honest way. Dinner was simple and we spread out the sleeping system. We had Sea to Summit tents, bags and mats, although I forgot one mat, so I slept on a coiled rope. It did not feel luxurious but Tarn and Takesh slept well which mattered most. We woke at 4.20 am and were moving by 4.50. The goal was to be high on the ridge before sunrise and to beat any wind that might pick up later. We used a GPX route uploaded to our Garmin watches. There are no cairns or markers on Mitre Peak so having the breadcrumb line was very helpful especially after dark. We came up onto the ridge in the first minutes of sunrise. Milford Sound was still in deep shadow and there was silence, then the peaks lit up orange. It was a powerful moment to share as a father and son. From here the scrambling became exposed but the granite is solid. We worked along what is often called the goat track, with a few steep steps that required careful movements. There were still a few hardened snow patches and they were icy enough that we kicked in carefully before committing weight. The final section toward the summit is a series of two bumps. Tarn and I dropped packs with Takesh and we moved faster across the last ridge. There were one or two moves that you need to stay focused on but it felt rewarding rather than sketchy. We topped out around 7.40 am at 1700 metres. The Sound underneath us was glassy and the Tasman Sea sat low behind the Fiordland hills. It was one of those mornings that no photo could capture. We did not hang around because the descent on granite takes time if you want to stay safe. We met up again with Takesh and had breakfast. There was one short steep down climb that Takesh wanted a rope for, so we rigged a simple abseil. Everything after that was deliberate steps, using hands, facing in when required, and letting gravity do the work. Back through the bush and then finally out at the shoreline. The IRB was exactly where we left it. By three in the afternoon we were back in Milford enjoying a decent meal. On the way down we met two packrafters who we gave a lift as otherwise they would have been working hard against the wind. We finished the trip by driving south to Colac Bay and went surfing which was the perfect ending to a Fiordland adventure.
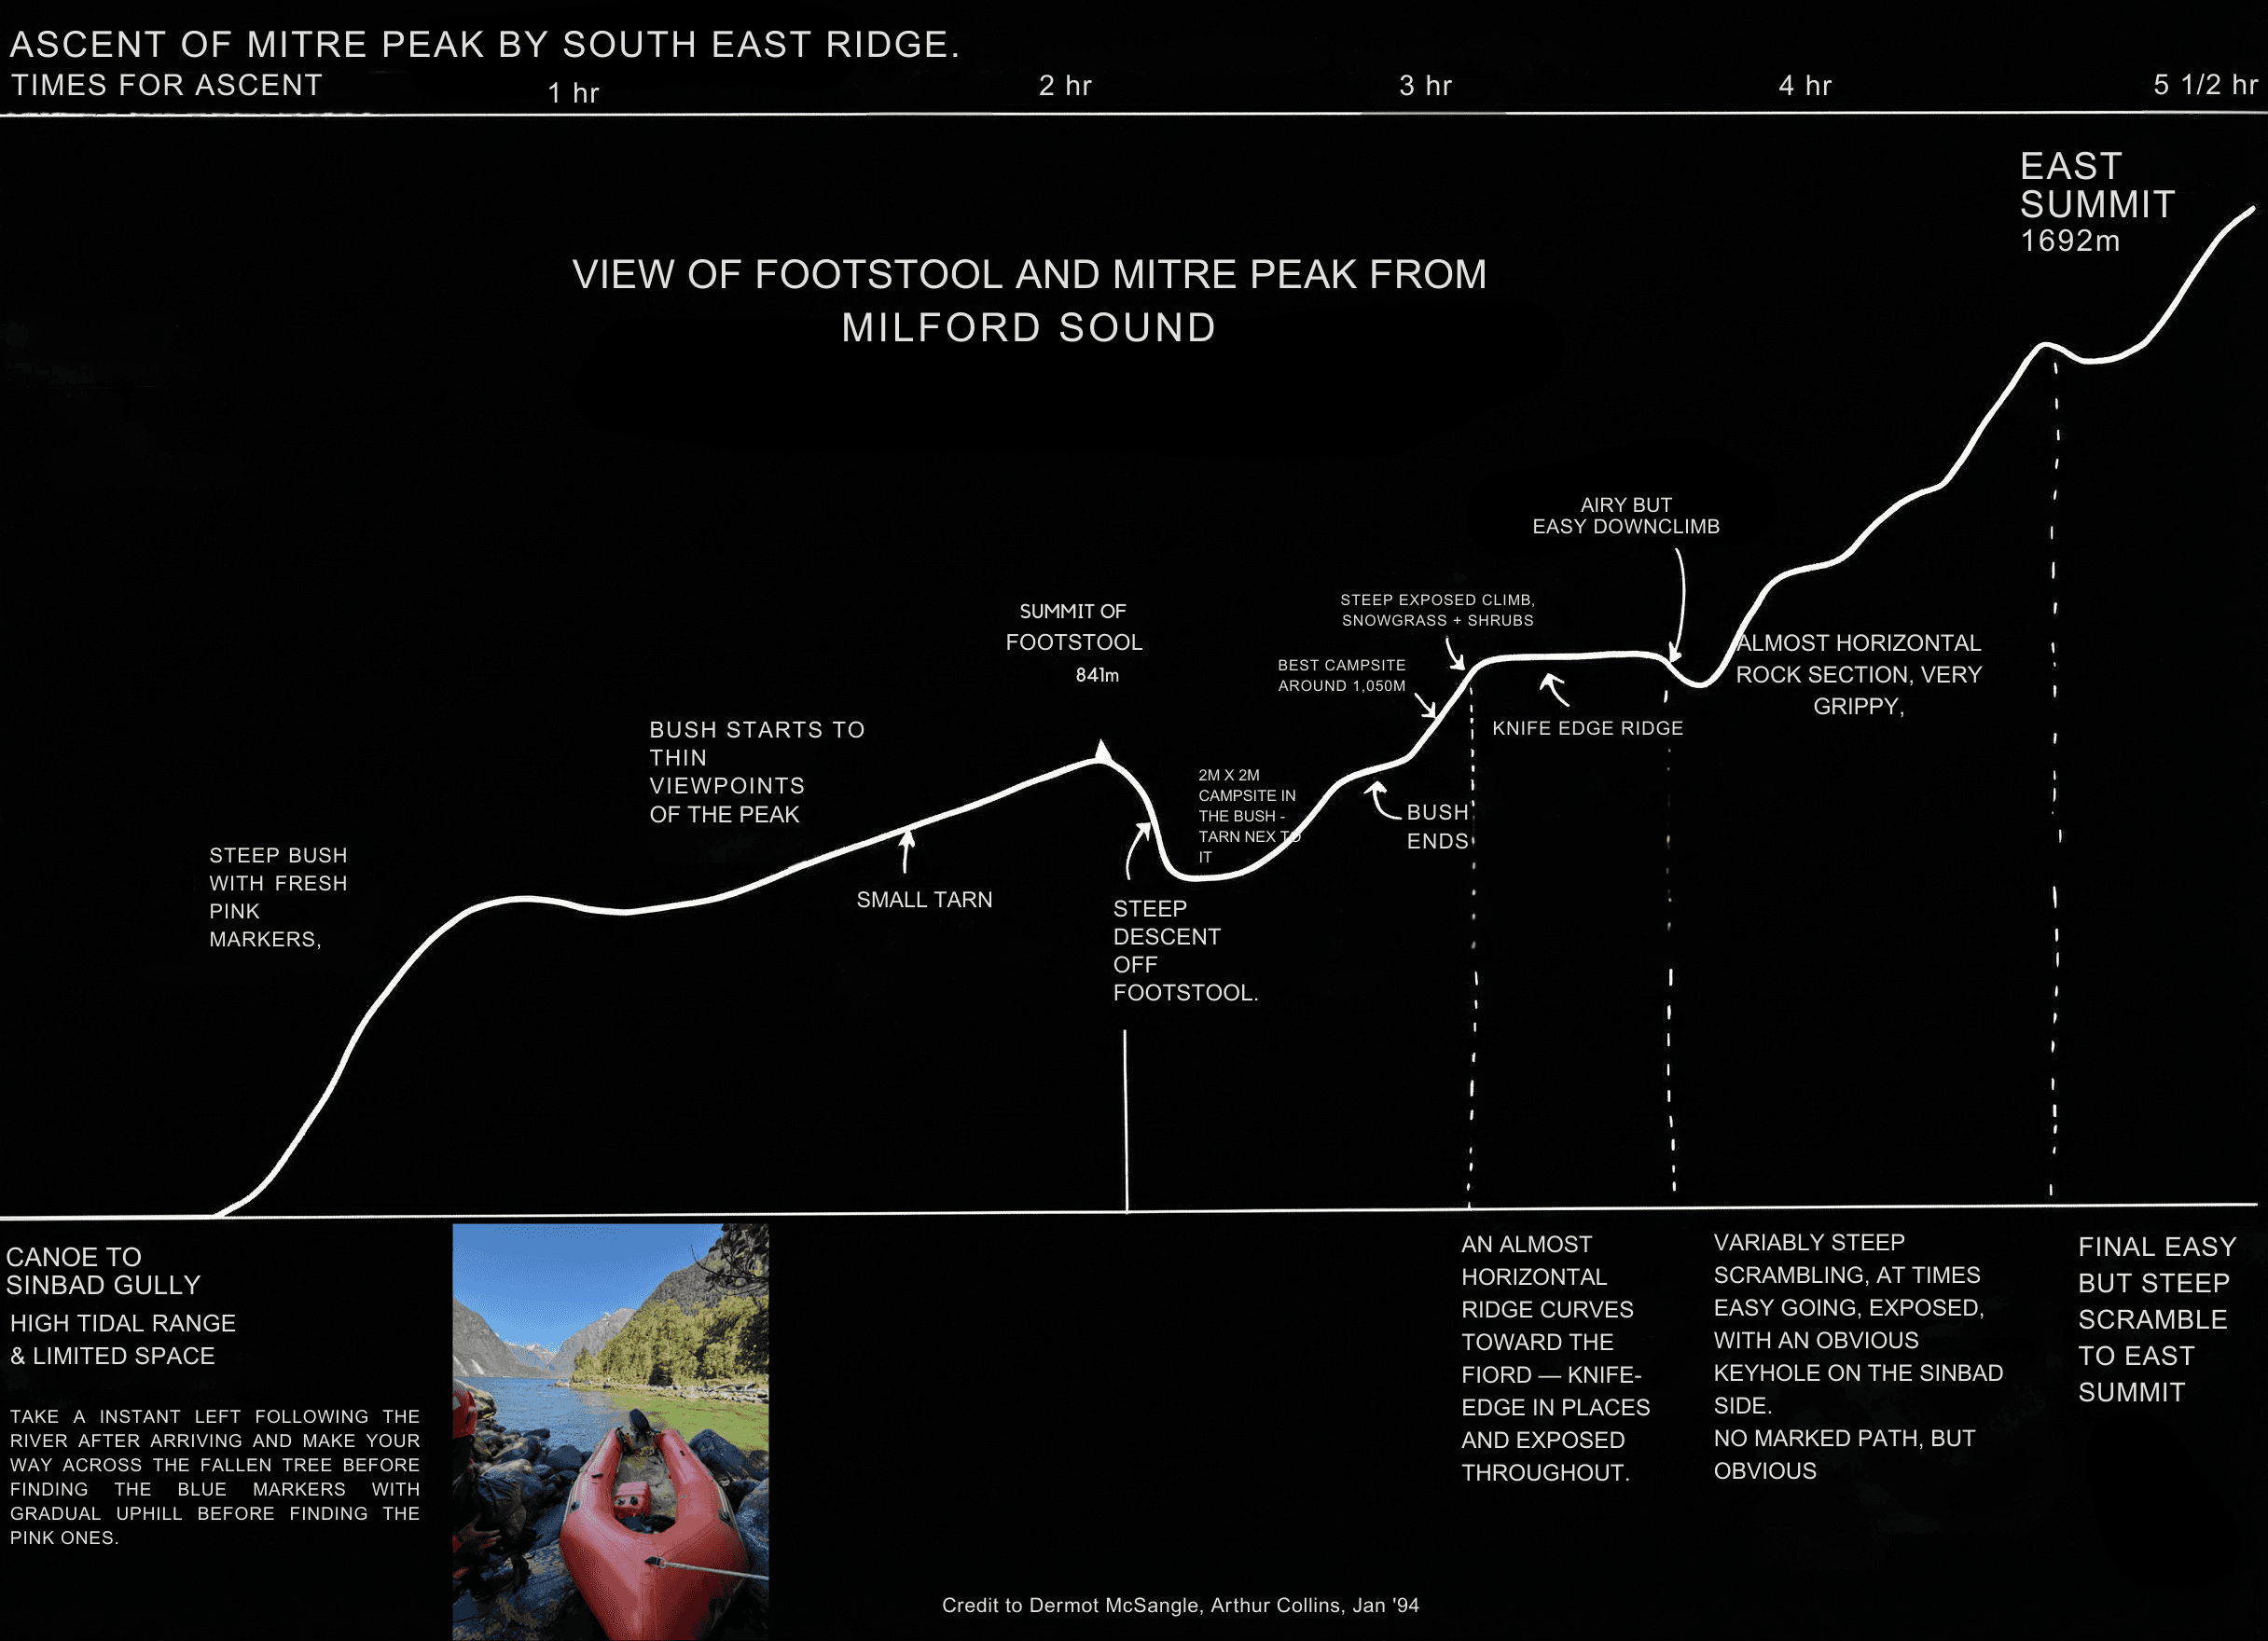
Detailed Route Description — South-East Ridge Ascent of Mitre Peak
Access & Start: Getting Across Milford Sound Our climb begins with getting across Milford Sound by boat, kayak, packraft or inflatable (IRB). We crossed at the narrowest point near the western end of the Milford Airport airstrip, roughly a 200-metre crossing, before following the shoreline to the mouth of Sinbad Gully. This first crossing needs respect. Boat traffic moves constantly through the fiord, and timing the crossing safely requires awareness, patience and clear conditions. Bush Climb: From Sea Level to the Footstool Plateau From the shoreline at Sinbad Gully the route climbs immediately into thick Fiordland rainforest. There is no marked track. We stayed committed to the ridge crest rather than drifting into side gullies, pushing steadily upward through dense bush, roots, scrub and steep, uneven ground. It is slow, physical and mentally taxing work, and navigation demands constant attention. Elevation builds consistently, with one key landmark being the feature commonly known as the Footstool, sitting roughly between 600 and 900 metres depending on line and terrain. Beyond this point the ridge drops sharply by around 150 metres before the climb resumes toward the bushline. Bushline, Tarn (if water), Bivvy or High Camp Options Just below the bushline on the Sinbad side sits a small tarn. It can be used as a water source, but we treated it as unreliable as it can dry out completely. Above the bushline we found a flatter shoulder of rock and tussock around 900–1000 metres, which made a natural bivvy and high-camp option with expansive evening and sunrise views over Milford Sound. Camping here set us up well for a more controlled summit push the following morning. Water becomes scarce above this point, so we carried what we needed from Sinbad Gully rather than relying on alpine sources. Above Bushline: Ridge, Notch and Crux Section Above the bushline the ridge narrows and the character of the climb changes completely. Around 1300 metres we reached a horizontal traverse leading toward a deep notch that marks the crux of the route. The notch is highly exposed, with steep drops toward Sinbad Gully on one side and straight down into Milford Sound on the other. The scrambling itself is not technically extreme, but the consequences of a mistake here are absolute. Exiting the notch required climbing an approximately 80-metre steep granite step on the Sinbad side before traversing back to regain the ridge near a distinctive key-hole feature. This was one of the most committing moments of the entire climb. Final Ridge, Summit Approach & Exposure Beyond the notch the ridge opens slightly but remains narrow and exposed. We moved carefully over solid granite, tussock and rock, enjoying high-quality scrambling while staying constantly aware of the drops falling away on either side. Two false summits guard the final section, and we dropped packs here to move lighter and more precisely. The final scramble demands calm movement, confident foot placement and full focus. The summit sits at roughly 1,690 metres above sea level. Standing on top, with Milford Sound dropping straight to sea level beneath us, the scale and exposure of the route is impossible to ignore. Descent & Commitment The descent follows the same ridge line and requires just as much care as the ascent, if not more. Steep slabs, loose rock and sustained exposure mean every move needs to be deliberate and controlled. We carried rope to manage the crux section on the way down and to give ourselves options if conditions changed. Even in good weather, the exposure and rockfall risk make conservative decision-making essential. Time, Difficulty, Exposure & Wild Card Factors This route can be pushed in a single long day, but that leaves very little margin for error. We chose to split the climb over two days, tackling the bush climb and high camp first, then summiting early the following morning while fresh and focused. It is a true summer scramble along a narrow, complex ridge with constant exposure straight down to the fiord. Strong fitness, confident scrambling ability and comfort moving in exposed terrain are essential. The biggest hazard throughout the climb is exposure. For long stretches the ridge drops thousands of metres on either side, and any slip would be catastrophic. Important Considerations & Safety Notes The bush approach is unmarked and demanding, and staying on the ridge crest is critical, especially in poor visibility. Water above bushline is unreliable, so all required water should be carried from sea level. Exposure is constant and severe, particularly around the notch and final ridge, with loose rock and rockfall being real risks. Carrying rope and basic climbing gear provides options if conditions change or retreat becomes necessary. Fiordland weather is unpredictable, and even in summer sudden wind or rain can dramatically increase risk. Good judgement, situational awareness and a willingness to turn back matter more than speed or ambition.


Gear list
Gear We Brought (All high-quality items, suitable for Fiordland conditions) 🧥 Clothing Layers Waterproof & Insulation Proper waterproof jacket Black Diamond Highline Stretch Shell – fully waterproof alpine shell 🔗 https://www.bivouac.co.nz/black-diamond-highline-stretch-shell.html Down jacket / puffer Outdoor Research Men’s Helium Down Hoodie – lightweight, high-warmth insulating layer (800+ fill down) 🔗 https://www.bivouac.co.nz/outdoor-research-mens-helium-down-hoodie.html Thick mid-layer fleece / insulated jacket Black Diamond Coefficient LT Hybrid Hoody (Men’s) – breathable hybrid mid-layer 🔗 https://www.bivouac.co.nz/black-diamond-coefficient-lt-hybrid-hoody-mens.html Black Diamond Alpenglow Pro Hoody (Men’s) – warm fleece option 🔗 https://www.bivouac.co.nz/black-diamond-alpenglow-pro-hoody-mens.html Base & Active Layers Polypro thermal top and leggings Outdoor Research base layers (merino or synthetic) 🔗 https://www.bivouac.co.nz/clothing/mens-clothing/outdoor-research.html Tee (merino or synthetic recommended) Hiking pants Outdoor Research Men’s Ferrosi Pants – durable and breathable 🔗 https://www.bivouac.co.nz/outdoor-research-mens-ferrosi-pants.html Lightweight shorts Outdoor Research Men’s Ferrosi Shorts 🔗 https://www.bivouac.co.nz/outdoor-research-mens-ferrosi-shorts.html Headwear & Hands Beanie Outdoor Research Vigor Plus Beanie – warm and versatile 🔗 https://www.bivouac.co.nz/outdoor-research-vigor-plus-beanie.html Gloves (scrambling & cold rock) Outdoor Research Men’s Gloves 🔗 https://www.bivouac.co.nz (search “Outdoor Research gloves”) 👟 Footwear Good trail shoes or boots with solid grip for granite scrambling ASICS Men’s GEL-Trabuco MT GTX – waterproof trail shoes with excellent grip 🔗 https://www.bivouac.co.nz/asics-gel-trabuco-mt-gtx-mens.html 3x Socks 🪖 Safety & Navigation Climbing helmet Black Diamond Vapor Helmet 🔗 https://www.bivouac.co.nz/black-diamond-vapor-helmet.html Garmin Fenix 8 Pro with uploaded GPX navigation Doesn't matter the watch as long as it has the abilty to navigate of course files 🔗 https://www.garmin.com/en-NZ/p/1703902/ NZ Topo app on phone (offline maps essential) ONENZ satellite messaging device or PLB 🎒 Packs & Storage 40–45 L pack (enough capacity for gear and rope) Black Diamond Beta Light 45 Backpack 🔗 https://www.bivouac.co.nz/black-diamond-beta-light-45-backpack.html 🛏 Shelter & Sleep Tent Sea to Summit Alto TR2 Plus Ultralight Tent 🔗 https://www.bivouac.co.nz/sea-to-summit-alto-tr2-plus-ultralight-tent.html Sleeping bag Sea to Summit Spark -9°C Down Sleeping Bag 🔗 https://www.bivouac.co.nz/sea-to-summit-spark-9-down-sleeping-bag.html Air mattress / sleeping mat Sea to Summit Ultralight Insulated Mat 🔗 https://www.bivouac.co.nz/sea-to-summit-ultralight-insulated-mat.html 🍽 Food & Cooking Freeze-dried meals Jetboil (or similar fast-boiling stove) 🔗 https://www.bivouac.co.nz/stoves.html High-calorie snacks 💧 Water Carry plenty of water from the start No reliable water supply on the route Soft flasks (500 mL recommended) Black Diamond or CamelBak soft bottles 🔗 https://www.bivouac.co.nz/water-bottles.html 🧗 Climbing Gear (Optional depending on experience and confidence) Harness Black Diamond Men’s Momentum Harness 🔗 https://www.bivouac.co.nz/black-diamond-momentum-harness.html Rope – 40 m recommended Abseiling/belay device + locking carabiner 1–2 slings or short length of cord (for rigging safe abseils) Some parties complete the route unroped. Others carry climbing gear for safety at the notch and during descent. Assess skill level and comfort with exposure. 🧰 Extras Worth Taking Sunscreen Powerbank (phone / Garmin backup) Headlamp with spare batteries Small blister & repair kit Emergency first aid supplies

